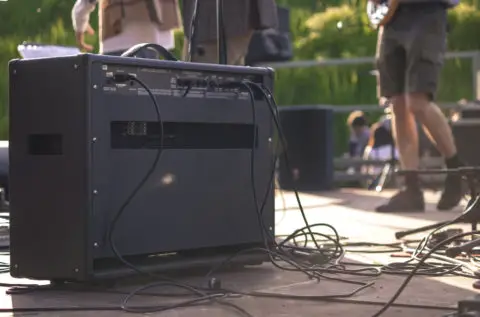
Building a DIY guitar amp from scratch could be a remote idea for many people. But the accessibility and assistance that an amp kit provides change everything. The idea of trying out the project becomes far more appealing.
To make the process even easier, here’s a detailed guide that’ll walk you through the entire DIY journey.
3 Reasons To Build Your Own DIY Guitar Amp
Creating a fully-functional device from the bottom up is definitely an achievement. However, some folks aren’t too sure they can pull it off, or whether they should even try.
There are three main reasons why you should build your own guitar amp. You might want to ponder them as you think about the possibilities.
1. Creating an Affordable Copy of Your Dream Amp
Boutique amps and vintage tube amps often come with a hefty price tag, and some are extremely hard to find.
Building a copy of one of these isn’t just about enjoying their looks or classical aesthetics. These DIY tube amps are often built with the same electrical layouts and components that their originals were made from.
That’s why the sound quality they produce is stunning. And as you plug-in your guitar and start to play, you’d think right away of the golden age solos and its memorable live performances.
The DIY guitar amp kits are often sold at a fraction of the cost of the Boutique amps or the original ones. And the result is incredible in every way.
2. Understanding Your Audio Systems to the Finest Detail
Building a tube amp requires a thorough understanding of the components, the mechanical aspects of the amp, and most importantly how the audio system works.
While working through these technicalities, you’d come across a ton of different terms that describe sound quality. You’d also learn how exactly good audio is produced, and where things go wrong and the jarring noises appear.
Fixing the signal issues like humming, clipping, inversion, and unwelcome secondary harmonics is always conducive to understanding true audio purity.
You could then match the various components of your audio system with proficiency. Moreover, when you listen to any system afterward, you can always tell whether everything is working fine or not, and how exceptional the produced sound quality is.
3. Learning Valuable Skills
Some enthusiasts start with simple audio kits, and as they accumulate their knowledge and skillsets, they work through more sophisticated DIY amp kits. This gradual learning and hands-on experience let you get intimate with the minutest details of amps. Both the theory of the system and the technical aspects of it.
From the outside, some tasks might look easy, but as you work through them some bugs could come up. It’s that process of debugging and finding possible faults that build up valuable experience. This is something that no amount of reading or watching videos can teach you, you have to do it to know it.
Once you’ve learned the ropes, you’d be a semi-pro. You might want to develop your skillset further and commercialize your efforts. It’s worth noting that some of the reputed amp Boutiques started out with enthusiasts who made a profession out of their hobby.
3 Best DIY Guitar Amp Kits Brands For Beginners
There are hundreds of DIY tube amp options to choose from. But some of them might be a bit too complicated or excessively pricey for beginners. That’s why we picked these entry-level selections. Mainly to encourage enthusiasts who are taking their first steps into the audio world.
You’d notice that they vary in their performance, power, shapes, and price points.
Tweed
The model ‘57 Tweed is a timeless piece that has taken part in many memorable performances. And now, you can have your own vintage Tweed, and create beautiful tunes with it.
This 5 Watt amp was originally designed to be a student’s amp, as the 5F1 circuit was simple and straightforward. However, its stellar sound quality soon placed it among the titans. It’s among the most popular amps you’ll come across.
This kit contains every conceivable part you might need, including the speakers, chassis, vintage tweed cab, and components. It comes with detailed instructions on how to assemble all the pieces. And if something is still unclear, there are photos and illustrations for reference.
Prime quality rarely comes cheap, and this kit is no exception. It’s certainly exceptional, but a bit pricey. Then again, the contents of the kit and the amp brand justify the price tag.
Fender
The Fender is another classic that you can put together in a weekend.
This kit is modeled after Fender’s 1965 15 Watt recording amp. It was a sensation at the time and appeared in a multitude of high profile concerts. Yet, its best usage was in studios, where it produced rich warm tunes for recording on vinyl.
Mini/Cigar Box Amp

This budget-friendly kit makes good use of cigar boxes. It’s an ingenious idea to convert a cigar box into the hub for an amp.
This 2.5 Watt amp works on a 9 Volt battery, which might seem a bit weak, but it’s surprisingly strong. It has fine-tuning capabilities, and you can direct its output to headphones or other output devices.
How Does an Amp Work?
Looking at the schematics, layout, or actual circuit board of an amplifier could put off anyone right then and there. Electronics have a reputation of not being suitable for the faint of heart. However, this isn’t entirely true.
It all comes down to this fundamental question: how can you eat an elephant? Exactly; piecewise!
That’s how we approach any electric, mechanical, electronic, or hybrid system. We divide it into simple modules, or little bites, that we can chew and digest at ease.
An amp’s function is to take a whispered faint signal, and make a glaring noise out of it. To achieve that, the amp has three main modules: power, signal conditioning, and signal amplification.
One of the great approaches to see how this works, is to follow the path of the signal from where it enters the amp, to where it comes out of the speaker. I recommend that you tune in to Uncle Doug’s presentation of how tube amplifiers work. I bet you’d see the whole world of electronics differently after that!
Overview of Signal From Input to Speaker
For the signal to get the gain it needs, the various tubes need to be powered up properly. Since each tube has different requirements, and none of them is the 120 Volts, 60 Hz that come from the mains, then some adjustments need to be made.
That’s the part that the input transformer handles. A 3-part voltage manipulation takes place right after the 120 Volts reach the secondary part of the transformer. Achieving a 5 Volt, a 6 Volt, and a 325 high Voltage DC. Each one of these is used in a specific place to amplify the signal coming out of the guitar.
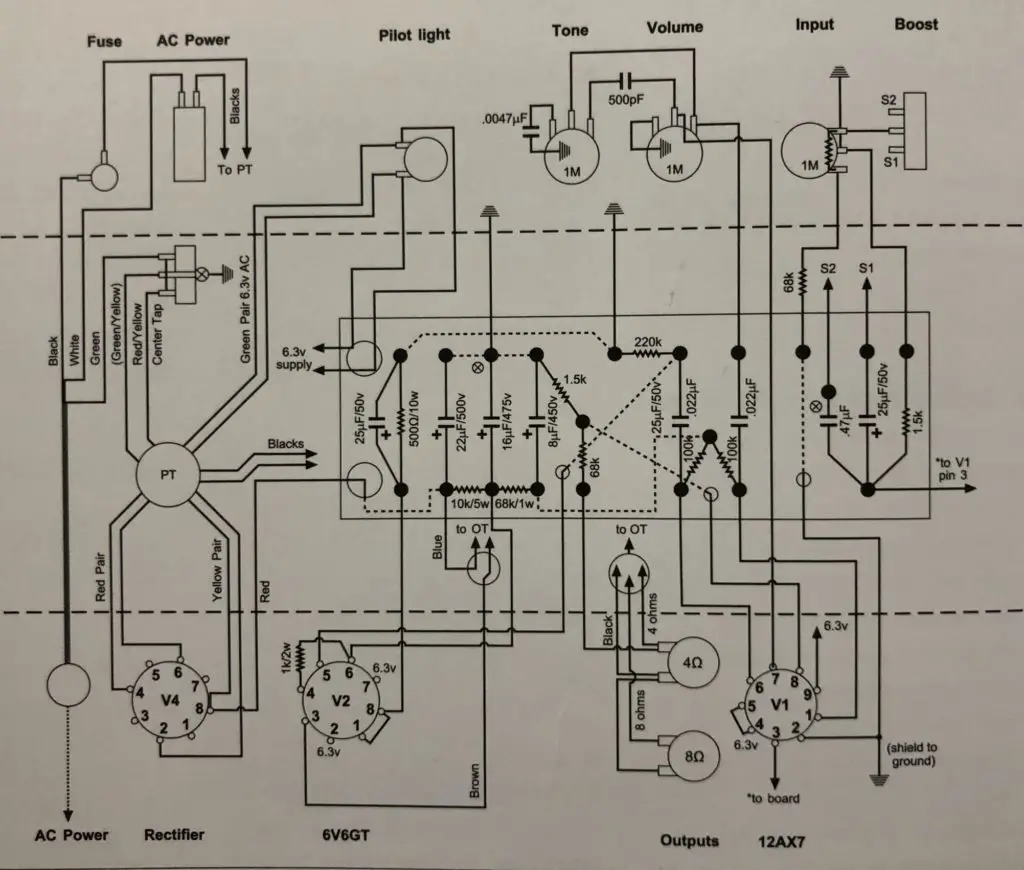
To demonstrate further, we can use the schematic of the 1950’s Fender 5F1 Champ guitar amplifier. It’s a simple design with incredible sound output. This classic can very well be your next project! It’s easy to make, and the electronics are accessible if you have rudimentary skills in place.
The point of entry of the guitar signal is often to the left of the schematic, and it represents the input jacks on the layout, or on the actual amp. This audio signal often has a voltage of around 7 Volts AC, and this signal is fed to the 12 AX7 for an initial gain stage or preamplification. Right at the exit, it’s fed to the volume control.
From the volume control knob, the signal is ready for the second and third stages of amplification. That’s achieved in the 6V6GT, or V2, outlined in the schematic. The audio signal receives a good amount of conditioning along the way to smooth out any kink, noise, or freakish oscillations.
The final stage is achieved through an output transformer, which transforms the signal from a high voltage-low amp presentation to a moderate voltage-high amp signal of 5 Volts and 2.5 amps. The DC component is gone at the secondary coil, and the speaker gets the neat amplified signal that rocks the world!
Difference Between Tube amp & Solid-State Amp
There are two basic categories of audio amplifiers; the analog type which is referred to as tube amps, and the digital type which is technically called solid-state amp. Both types perform the exact same function of magnifying the incoming guitar signal. However, one achieves it through tubes while the other reaches the same goal through using transistors.
The general consensus about the matter is that tube amps are the better devices, and the sound they deliver is incomparable in any way. This was true for decades, but with the new advancements in electronics and coding capabilities, the solid-state amps are currently as good as tube amps, if not occasionally better.
The big question now is, if you have the full choice, which one would you select? To answer that with fairness, let’s make the case for each, and see where it falls short.
Tube Amps
Tube amplifiers are definitely capable of delivering great tunes. They have survived well for decades. And even now with all the advancements in digital electronics, they’re still held in a place of high esteem.
One of the huge pro points in favor of tube amps is the mellow nuanced sound and wide dynamic range. Also, tubes are non-linear, so they give a different response as the volume and frequencies change. In addition to that, the added harmonics are often in even order, which feels much more pleasant to the human ear.
On the other hand, tube amps have some unfavorable traits. They’re rather bulky, so the cabinets and the whole amp tends to be larger and heavier than their solid-state cousin. Tubes are also far more fragile than transistors.
Being made from glass is a clear vulnerability. And even if the tubes survive breaking through impact, they’d age after a few years and need replacement. This is particularly inconvenient for these folks who cringe a little from all the required technical intervention.
Finally, the price of the tube amps is significantly higher than the solid-state amps. It could be reduced a lot though if it’s assembled from its basic components, or from a kit. This naturally requires some manual dexterity, but the result is worth gaining the necessary skills.
Solid-State Amp
The beginnings of these digital amps weren’t too stellar, and this rep caught on with these amps for quite a while. It’s worth noting though the newer models are capable of delivering a tube-like mellow sound quality. The tinny sounds are long gone, and now the audio produced is clean, rich, and reliable.
Transistors and the electronic components that go with them are remarkably smaller than tubes. This called for reducing the overall size of the amps, and the resulting compact portable devices are certainly much more convenient.
Solid-state amps are also more sturdy than their analog counterparts. They’re much less prone to breaking, and they have a longer lifespan. Then again, if a transistor fails, it would need professional services. Whereas, changing tubes can be performed by well-informed hobbyists.
These digital amps are mostly more affordable than tube amps, but there are certainly some high-end products that exceed the usual price points for solid-state amps.
The main downside of these amps is the third-order harmonics they produce, which aren’t the best thing to offer in the audio world. In addition, some music genres benefit from the nuanced response of tube amps and the rich tones they produce. Rock probably tops the list, while Jazz works nicely with the digital amps and makes the best of their predictability.
The Final Verdict
Tube amps will always have a revered status in the audio world. And even though the digital amps try so hard to emulate the sound quality of the vintage tubes, they’re still a copy of sorts.
Having said that, it’s worth noting that some solid-state amps are capable of reproducing the non-linearity of the tubes. The sound quality can hardly be discerned from the analog amps, and they’re even housed in classic-looking cabinets to complement the whole impression.
Both amps have solid merits and perform well. The final decision then is subject to your personal preference. A swaying factor might be if you’re into building up your own amp. In that case, the tube amp would be a fine choice!
Safety Warning
Tube amp kits aren’t exactly lego sets. They both involve assembly and putting a system together, but the amp is a high voltage device. This means it has a life-threatening risk, so extreme caution should be practiced at all times.
While the mains voltage is 120 Volts, the input transformer yanks this value to 325 right at its secondary output. This is further amplified within the circuit to 600 or 700 Volts AC. This voltage could be lethal if it passes through the human body.
Furthermore, the various capacitors typically hold the charges for some time. Even after the power is turned off. That’s why the circuit is still off-limits and should be approached with the same degree of caution even when the device is not plugged in.
Approaching an electric circuit should only be done if you are fully knowledgeable of the basics. Safety around electric circuits is a serious matter and should be treated as such. Also, Learning how to discharge a capacitor is an essential part of the rudimentaries. It’s a frequent requirement while working with tube amps.
Avoid putting both hands on the circuit or chassis. This increases the risks significantly, as this setup focuses the electric shock around the heart and chest area. Using one hand only while probing the circuit is highly recommended.
Checking all connections, ground points, and testing for possible shorts is a critical step before turning on the amp. Using fuses with a suitable rating is a necessary step as well.
The soldering iron is another potential source of injury. You should be well-trained in its usage, soldering safety, and it’s best to be authorized or okayed by a professional. Use the soldering iron in a well-ventilated place, and if possible use a fan to draw away the fumes.
Only use a fully functional solder iron with a proper rating. Watch where you leave it, and make sure that it’s kept on a safe spot on the bench. It should always be clear from your range of motion, and the movement paths of your colleagues. Unplug the solder as soon as you finish your work, and dispose of the remaining solder in a proper manner.
These were only some of the important safety tips you should be aware of. However, this is not a complete safety manual. It’s necessary to be well-versed in the safety requirements before working on any electric or electronic project.
How Many Watts Do You Need In A DIY Guitar Amp?
This is a simple question that often warrants a complicated answer! The quick answer is whatever you like. A brash answer is whatever you can afford. And a wise answer is that it comes down to your specific requirements.
To add one more layer of complexity, another point that you might want to consider is the type of amp you’re using.
Tube amplifiers tend to be louder than solid-state ones with the same rating. So if you’re used to a 50 Watt tube amp, then you’d need a 100 Watt digital amp to get a similar output. Solid-state amps seem to be laboring hard to produce vibrant sounds, and we don’t really like to exhaust them like that.
The power values we’ll mention next, are all tube-amp powers.
Selecting the right wattage depends on the kind of sound you’d like to hear. Some people jam with a high power amp but set the volume to a low or medium setting. This seems to bring out the full range of tonality from the music.
To make things more rational, let’s make a shortlist of the possible ways you could be using your guitar:
- You’re a beginner and would like to learn the ropes with a nice sounding amp.
- You play occasionally and jam a little with your friends
- You’re a pro and gigs are part of your daily routine
- You play with a band and the drummer is really loud!
- You’d like to record your tunes and come up with a crystal clear sound quality
Beginners are advised to go with 10-20 Watt amps. This is usually suitable for the capabilities of their guitars, the place they practice in, and the budgets they have. Occasional jammers could ramp it up a bit and go all the way to the 50 Watt varieties.
Moving on from the novices and semi-pros, the real players would often go with the higher powers. But some already have rigs that include powerful mics and speakers, so they opt for the 20-50 Watt varieties. It’s smart to only play with what you need, rather than what’s available.
An extra loud band might place a different set of requirements. If everyone is already too loud, you wouldn’t want your instrument to drown in the sea of glaring sounds. And they wouldn’t want that either. To hold your own, you might have to work with the highest power you can get, in addition to beast speakers and a good mic. Heavy metal is all about this.
Recording music is the polar opposite of that. You need clear sounds that don’t offend the receiving end of the system. If you’re going to record directly from the guitar to the amp to the line-in, then the lowest wattage would do. However, if you’d be going old-style and use a mic, then a 20-50 Watt amp would be great.
How to Read A Schematic
Reading the graphic representation of electric circuits can be a bit daunting for beginners. The addition of special components, like triodes and pentodes, increases the complexity of the situation.
Luckily, learning how to read schematics is much easier than learning musical notes or the Greek alphabet. Once you decide to proceed with assembling your kit, you can get more acquainted with the various symbols.
Over the duration of a few days, you should be able to understand the different parts of the circuit, and why each part needs to be placed there. Also, you should be capable of identifying these components and figuring out their polarities and values.
The Different Symbols in a Schematic
Besides the basic electronic symbols, here are some of the terms and component names you’d see as you study an amp schematic:
- Cathode resistor: creates a bias voltage between the cathode and grid.
- Bypass capacitor: used as an electron container to increase the gain.
- Grid leak resistor: keeps the grid at zero volts DC by disposing of the excess electrons.
- Grid stopper resistor: filters out the high frequencies that exceed the level of human hearing.
- Coupling capacitor: eliminates the DC signal, while maintaining the AC signal.
- Load resistor: shifts the circuit into a voltage amplifier instead of a current amplifier.
Some Tips for Reading Schematics
Any process becomes instantly easier once it’s divided into simpler steps. Here are some tips to navigate the schematic like a pro:
- The schematic usually comes with a components layout and wiring diagram. You should read them together, as they explain one another.
- Make sure you understand the schematic thoroughly before working on it.
- To understand the schematic, follow the path of the audio signal.
- Divide the circuit into functional modules.
- Specify the exact points where the voltage or power change significantly
- Specify the points where the signal changes its amplitude/phase.
- Color code the path of the signal from input to output.
- Mark the correct orientation and polarity of the different components.
- Translate the topology of the components in the schematics to the eyelet board
 Click for full size.
Best Schematics Resources
If you want to practice what you’ve learned so far, but not sure where to start, here are some of the best sites to find project ideas.
The projects presented are mostly beginner-level, with simple layouts, straightforward instructions, and clean amp schematics.
You can also download other guitar-related projects, speaker plans, and various other resources. The information is spot-on and easy to access.
If you’ve been daydreaming about jamming with a vintage amp, here’s a fine chance to make your dreams come true. This site contains schematics of beauties like the Fender, Vox, Traynor, Music Man, and many others.
It’s clearly dedicated to the glam of the classics, and once you step inside, it could be hours till you decide to resurface. The hardest thing about browsing through this site is deciding on a single kit. Personally, I want to build each and every single one of these amps, and try it with my guitar!
The best thing about this site is the wide variety of models available. Almost any schematic that crosses your mind would be found on their list, and hence the name; Schematic Heaven.
There are also other resources about modifications, effect pedals, bargain amps, and similar interests. It’s a wholesome site that no audiophile should pass up.
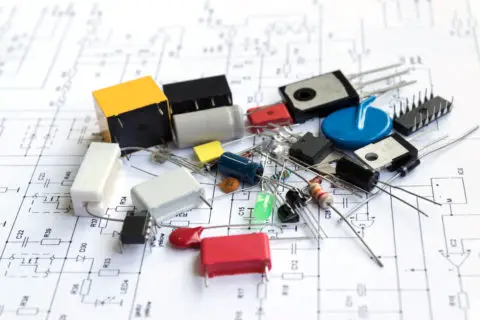
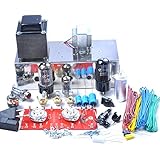
10 Parts You Need To Build Your Own Tube Guitar Amp
At this point, you’ve presumably picked an amp, and printed out the schematic, component layout, and chassis design. It would be appropriate to explain a thing or two about the required components to make sure everything proceeds without a hitch.
Tools Required
For this project you’ll need a soldering iron around 25 to 50 watts, resin core solder around 0.032 diameter, a variety of sizes of small spanner wrenches, and a couple of sizes of flat and Phillips head screwdrivers.
Cabinet
The best type of cabinet is often styled around the vintage amps of the good old days. Some of these shells are in fact originals, but that’s not a frequent occurrence. There are two basic types of cabinets; one is large enough to house a speaker and a chassis, and another type that doesn’t.
For the purposes of this article I’ll be describing one of the more common styles of guitar amp kit – a Fender Princeton-style combo amp from the tweed era. You’ll find guitar amp kits readily available in this style.
You’ll need a plywood or solid pine measuring around 16 inches high by 20 inches wide by 10 inches deep. It’s important to make sure and measure and position the speaker and the completed chassis often as you build in order to make sure you are leaving enough clearance between the speakers and the transformers.
Here are some of our favorite selections:
Mojotone Narrow Panel Tweed Champ Style Cabinet
No products found.
This cabinet is a faithful reproduction of the Fender Tweed amps. It’s a spacious cabinet that’ll house the amp, speakers, and bulky transformers without complaint.
Tweed Deluxe Style Guitar Amplifier Combo Speaker Cabinet
No products found.
The narrow 16” x 20” x 91/2” cabinet is crafted from fine woods and exceptional joints. Having a beauty like this around is pure pleasure, and it’s reminiscent of the golden days of music.
It’s a bit on the pricey side, but totally worth the cash.
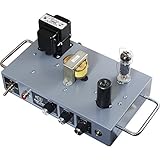
Chassis
The chassis is the metallic box that houses all the components, wiring, transformers, and user interface panel. It’s the hub that houses the amp’s electronic parts, as well as the connections with the input and output to other devices.
A reputable parts supplier will be able to provide you with a chassis made to approximate a Princeton-style layout, which will work nicely for this project.
If you’re wanting to build the chassis yourself, I congratulate you for wanting to get seriously into the details of building this amp! A company like Hammond makes a variety of steel and aluminum enclosures that are good for this – you’ll be looking for something around 14 inches long by 6 inches wide by 3 inches deep.
Chassis that are supplied with a kit are already drilled and punched to spec, so feel free to save yourself some time here.
The right chassis might be a little hard to find, so here’s a shortlist of the best options.
5E3 Deluxe Guitar Tube Amp Kit Chassis

This chassis is 14.50″ x 4.13″ x 2.63″, which is an appropriate size to house a small amp kit. It might feel a little bit crowded with parts, but that because of its narrow rather than wide orientation.
5F1 Tweed Champ Amplifier Kit Chassis
This chassis and kit come with a ton of components. You’d need to be a bit of a pro to assemble it together, as its wiring and layout might be a tad tricky. It’s mostly straight forward though.
MOD102+ guitar amp Kit Chassis
This kit is one of the very best, with its easy to navigate schematic, to the simple geometry of the layout. All the parts and pieces are included, so building this amp should be a breeze.
Tubes
Tubes top the list of the essential components for the amp. They’re literally the heart and soul of these devices. These components determine how much gain your signal would get, and what the sound quality would be like.
For your combo amp, your tube setup will likely consist of something along the lines of:
- 1 6L6
- 1 12AX7
- 1 5Y3
Here are the best tubes you can buy for your guitar amps.
JJ 12AX7 / ECC83 Preamp Vacuum Tubes
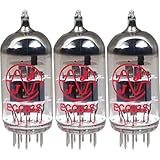
This tube is well-balanced and provides a fine sound quality all-around. It produces mellow rich notes around the low-end, mid-range, and high-end. As you run it on overdrive, it would maintain a smooth and powerful sound.
It comes as a package of three tubes, and its overall price is pretty reasonable.
Tung-Sol 12AX7 Preamp Vacuum Tube
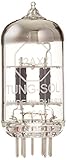
This tube has a dynamic three-dimensional surround sound feel to it. It’s equivalent to the 7025/ECC83 tubes, and would serve wonderfully as a replacement.
It’s a high-performing tube that’s offered at a fair price.
JJ Electronics Amplifier Tube (T-12AX7-S-JJ)
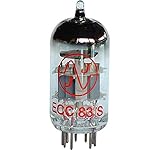
This is a fine specimen of the 12AX7 vacuum tube, which can serve as a preamp, or initial gain stage. It’s versatile and used equally in stereo amplifiers as it is used in instrument amplifiers.
Speaker
Including speakers in the cabinet of the amp is an optional matter. But it’s generally more preferred to the rig where the speaker is a separate entity. For starters, it takes much less space in the combo configuration. And it’s also far more portable.
A good combo amp needs a good speaker. Look for a 12 inch speaker from a company like Celestion or WGS. An Eminence Legend gives a nice traditional Fender-style tone that helps achieve that vintage tone. Along with about a foot of speaker wire, you’ll need a 4-pack of speaker mounting bolts and T-nuts if your cab doesn’t have a baffle already.
Here are some speaker brands that you might want to consider for your kit.
Eminence Patriot Texas Heat 12″ Guitar Speaker
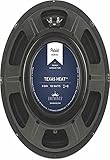
These rich and high-sounding speakers were made for the soulful singing of the South, as much as the energetic American Rock. interestingly, it also performs beautifully with the Blues.
The tunes often come out clean, mellow and filled with heat. It’s relatively more expensive than its peers, but then again its high quality justifies the extra cash.
CELESTION Guitar Speaker (T5814)

The Celestion was made for guitars. Whether you’re practicing, jamming, playing on stage, or recording a piece, these speakers are the perfect companion.
This 10” speaker is a real catch, and it fits perfectly with the guitar amp kits.
Jensen 8” Speaker (C8R8)

The Jensen is a compact little speaker that’s been around so many great performances. It provides warmth and clarity, and a highly nuanced response for the lows, mids, and highs.
Output transformer
Much of the distortion of a tube amp comes from the output transformer, making it perhaps THE key component on your tube amp. If you’re building your amp from scratch, you should be looking for a transformer intended for single-ended use, properly air-gapped, rated for approximately 15-watt output, with a primary of around 4k ohms to 6k ohms going into an 8-ohm secondary.
Power transformer
The power transformer converts the signal coming from the power tubes to the speaker.
If your guitar amp kit doesn’t already come with a power transformer, it shouldn’t be too hard to locate a supplier with power transformers intended for use in a tube amp. Looking for these specs:
- Primary: 120V
- Secondary between 310V-0-310V and 330V-0-330V center-tapped
- center-tapped 6.3V AC filament supply at 4A
- 5.0V AC rectifier filament supply at 3A
Eyelet board, insulating card, and brass grounding plate
For assembling the circuit board, an eyelet board made for use with a SF1 and SF2 Princeton-type amp will work well for your project. A good amp kit will provide these materials to you.
Resistors
I tend to lean more toward keeping noise lower by using a mixture of carbon composition resistors and carbon film. Here are the specs you should look for:
- 68k (1-watt)
- 1M (0.5-watt)
- 1k (2-watt)
- 220k (1-watt)
- 10k (5-watt ceramic)
- 500-ohm (10-watt ceramic) (470 tends to be more common and works well too)
- 2x 1.5k (1-watt)
- 2x 100k (0.5-watt, preferably carbon composition)
Capacitors
- Signal:
- 2x 0.022uF
- 0.0047uF
- 500pF
- 0.47uF 400V axial
- Electrolytic:
- 2x 25uF/50v
- 16uF – 22uF/500V
- 16uF – 22uF/450V
- 8uF/450V
Connection hookup wires
You’ll need around 2.5 feet of solid core cotton braided 20-guage black and white wire. Cotton braided keeps together when near the excessive heat from soldering, and tends to be easier to handle because the covering can be pushed back to expose the desired wire length.
Miscellaneous parts
And finally, you’ll need a variety of miscellaneous parts to tie everything together:
- A power cord nad power switch
- A mini on/off/on SPDT toggle switch (boost/voice)
- Quarter-inch plug for speaker leads
- 2x 1M audio potentiometers
- Fuse assembly
- 1-amp fuse, 1.24” slow-blow
- Screw-secured control knobs
- Quarter inch switching jack for input
- 2x quarter inch non-switching jacks for output
- Pilot light assembly jewel and bulb
- Ring terminal for grounding to the tube socket bolt
- 3 lug terminal strip
- nine -pin ceramic tube socket
- 2x eight-pin ceramic tube socket
- 3 rubber grommets
How to Build the Amp
We’ve already covered all the theoretical steps, and now it’s time to put it all together. If the previous parts of the process were done carefully, then this final stage should be the cherry on the cake.
You might face a few hiccups, and that’s perfectly alright. The best way to retrace your steps is to measure the zero voltage, low voltage, and high voltage points. Test the circuit with no-load first, then check all the functions with full-load.
Here’s a rundown of how you’d go about with the actual building of the amp.
- Review Wiring diagram
- Prep the cabinet & boards
- Install chassis-mount components
- Wrap & solder the eyelet board & wrap parts onto it
- Install the eyelet board into chassis components
- Finish wiring
- Final assembly
FAQ
This is a sum-up of the most common inquiries I get, and the answers to the best of my knowledge. Hopefully, they would clear up some of the mysteries surrounding DIY guitar amps. And make things easier as you build your own.
Q1: What gauge wire should I use?
There are datasheets, tables, and thorough mathematical calculations to give you the exact gauge that you need. However, bending down on a desk all day with a calculator isn’t exactly an audiophile’s fantasy!
So we’ll eyeball it a bit here, and take the experts’ advice on the best gauge to use in each part of the circuit. If you’re using a kit, then you’d often get specific recommendations for the wire. If not, then this recipe should work:
- Heater wires: 18 ga – stranded
- Audio path: 22-24 ga – stranded
- Feedback loop: 22-24 ga – stranded
- Power path: 20 ga- stranded
- Ground: 12-14 ga – solid copper
Q2: Do I need a preamp?
If you’re going to build a full-on guitar amp, then you don’t need a separate preamp. This is a stage that’s included in the basic circuit. It’s the initial gain and conditioning part of the circuit.
Some people would like to add a preamp though, when the guitar impedance and the power amp impedance aren’t well-matched.
Another typical usage of the preamps, separately, is when a player is on the road, and doesn’t want to carry plenty of stuff. In this case, the preamp gives the music a little boost in front of the mic, but of course, this doesn’t compare to the performance of a power amp.
Q3: How hot should the tubes get?
The tubes of your guitar amp need to warm up fully before you start playing. The instruction manual often details the required standby duration that you should allow. This is usually in the range of 20-30 minutes. Otherwise, the amp performance becomes unpredictable and dull.
The tubes shouldn’t get too hot though, or they could get damaged. Some users start using fans if the temperature of the tubes reaches 150 degrees, while others consider 250 the threshold to start taking action.
Q4: How to tube roll
This is a fine-tuning process wherein you try out different tubes of similar specs and see which one delivers the best sound quality.
You should get the datasheets of the tubes, and compare them fully before attempting a tube roll.
Q5: What’s the difference between a guitar amp kit and a stereo tube amp kit?
As the names imply, the main difference is in the intent. A guitar amp kit is used to amplify the sound of a musical instrument and a stereo tube amp kit
A music instrument amplifier receives the raw sound signal, conditions it, and amplifies it. Whereas a stereo amplifier works on a different input signal that’s already conditioned but needs a boost and some nuances.
The circuits are completely different, and they shouldn’t be used interchangeably.
Here are some additional resources I hope you find as helpful as I do:
- Amplifier Kits Directory from metrodcmusic.com
- How To Build A Guitar Amp From Scratch from musicradar.com
- Dimed & Dangerous: The Joy & Heartbreak of DIY Amp Building from premierguitar.com
- Mod 102 Guitar Amp Kit from modelectronics.com
- Guitar Tube Amp from instructables.com
