How to change strings on a guitar correctly
Table of Contents
Sooner or later every guitarist is faced with the fact that it is time to change the guitar strings on his instrument. Many people out of the economy or out of ignorance delay this moment until the first torn string, but it is wrong. The fact is that the strings on your guitar should be changed regularly because it sounds better with fresh ones. If it’s about recording, you have to change strings on a guitar after every session. If you just regularly practice on the instrument, then the time of replacement is suitable when the strings stop producing the characteristic ringing. The main rule: if your guitar starts to sound worse, but nothing has changed in it, it’s time to change strings.
Why is it important to change guitar strings correctly?
It would seem that it’s easy enough to change the strings and that’s it, nothing complicated. But in fact, it’s important to do it right. How you put the guitar strings on your guitar determines how it will sound, how long it will last you, how it will tune and how comfortable you will play. That’s why there is a special algorithm for this. Below we have broken down all the nuances of this process in detail so that after reading you have no questions left.
Preparation for replacement. Removing the old guitar strings
Gradually loosen the tension of each string, some guitar masters say that it is better to do it in order: the sixth, first, fifth, second, fourth, third, so that the deflection of the neck changed evenly. And many say that as soon as you remove the first string, you must immediately replace it with a new one, and so on with each string. The disadvantage of this method is that you can’t wipe and clean the guitar, and this is important. So if you haven’t changed guitar strings in a while, it’s better to gradually loosen each string and remove them all at once, so you get access to the soundboard and the fingerboard.
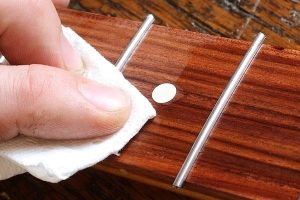
At this stage, it’s better to wipe your guitar body and fingerboard, and it’s not just about aesthetics, because if you leave the fingerboard dirty, a new set of strings will quickly collect all grease, dust, and other dirt and lose its sound and pleasing appearance. As the saying goes, “yuck it up,” keep your instrument clean.
How to remove the guitar strings from an acoustic and classical guitar
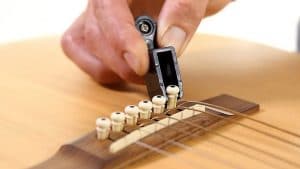
The peculiarity of an acoustic guitar is that the guitar strings on its bridge are fixed by plugs. Which are inserted in the holes where you want to put the tips on the strings. To remove the string, you need to gently pull out the plug corresponding to it, preliminarily loosening the tuning pin. It is better to use special pliers with soft rubber ends instead of pliers or pliers so as not to leave traces of barbaric intervention on the bridge. Besides, plugs are made of plastic and can break if handled carelessly.
You might notice some ugly scratches on bridges and plugs on older guitars, usually caused by the unfortunate guitarist’s pliers. If you like to take care of the technical side of guitars. Tighten the neck, do some bodywork, fiddle with electronics. It’s better to get a special set for guitar care. As a rule, it has a special device for accurate and fast rotation of picks, screwdrivers that correspond to the size of guitar screws, small files for reaming the riff for thicker strings, and other tools. Having them at hand, you do not need to look for the right tools for your “wooden friend” it’s very convenient. Sometimes such kits include polishes and oils to take care of the fingerboard.
To quickly and safely remove the guitar strings and pull out the plugs, there are special devices for cranking pins.
On a classical guitar, the strings are attached to the bridge with a loop. When you have loosened the tuning knot, gently untie the loop knot on the bridge.
How to remove strings from an electric guitar and bass guitar
Depending on the type of bridge you have on your guitar, the process may differ slightly. If your guitar has a bridge where the strings go through the body, loosen the tension, remove the tip of the guitar strings from the head of the pick. Then push it through the body, pull the weight, and remove it. If your guitar has a Floyd Rose, you’ll need to unscrew the locking top locks at the head of the neck and at the bridge. The question is a little easier with ordinary tremolo machines. But in some of them to get the strings you have to remove the plastic cover. Only this way you’ll get access to the compartment with holes for the weights. To change strings on a bridge that doesn’t involve putting strings through the body, just loosen the string and pull it out of the bridge.
There is no difference between a bass guitar and a regular electric guitar in terms of putting new strings, as well as special features. The only thickness of guitar strings and the force with which picks pull them on differs. The only warning – do not to tension strings too sharply, the broken bass strings can seriously cut you.
Loosen the tension of old guitar strings
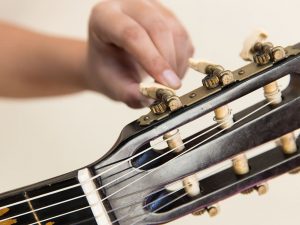
To loosen the string tension, with your hands or a turntable, twist the tuning pin in the right direction. Pay attention to the way the strings are standing: 4, 5, and 6 must be wound counterclockwise when looking from above at the head of the neck, 1, 2, and 3 must be wound clockwise. After installing the new set, everything should stay the same – this is an ergonomic and correct winding.
Removing the guitar strings
After you have loosened the tension, carefully remove the strings. Some guitarists advise boiling them to make them ring again, others advise “Fae.” We answer: buy a new set and don’t do this necromancy.
Wipe the guitar fingerboard
Finger grease, dirt, and dust settle on your guitar fingerboard. This causes it to change its color from noble wood to dark and unsightly. If you don’t wipe it down when you change strings, the dirt will settle on your new kit and it will quickly lose its tune and stop sounding good. Some fingerboards need a lemon oil soak, guitar strings change is a great time to do this. Read more about how to care for different guitar fingerboards here.
String Installation
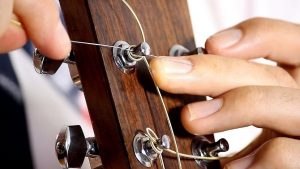
The strings are changed as a set for optimum tension. If you have a bridge with strings over a deck or with regular string holders. Put the tip of the string through it and make a special “lock” when you install them on the head of the neck. Put the string through the appropriate hole for the string (this is important) so that its end was under the coil, make several turns of the stake, so that one coil is over the end of the string, and the rest are under it. This way you’ll lock the string in place so it can’t move anywhere when you play or tune the instrument. This makes it much easier to tune your guitar once the strings are in place.
For an acoustic guitar
This process is repeated with the correction that in the bridge the tip of the string with weight is held by a special peg with a ball at the end. And for a classical guitar, you need to tie knots on both sides: on the pegs and the bottom threshold for the strings.
In the Floyd rose system to change strings they have to be installed in a reverse way, as the tip of a string without weight is first put through a tuning pin. Then through top locks, it goes to a string holder and is used for fastening in a bridge. After that top-lock at the first fret is fastened. If you decided to change a set of strings to a thicker or thinner one and your Floyd “fell” or, on the contrary, “rose” higher than usual. It is necessary to adjust the springs in the guitar body.
They allow the Floyd rose to make unusual sounds, tightening and loosening the tension of the strings as the musician wishes. Some guitarists don’t like these machines because the guitar can’t be tuned quickly and it takes longer to set the strings. But others just can’t live without the “divebombing” and wild howls of the guitar in the style of Dimebag Darrell from Pantera. What’s closer to your heart is up to you.
Unpacking the new set
Each manufacturer packs strings differently, some choose individual packaging for each string. Some prefer to seal all the strings in cellophane, winding them up in a round “ball. The main thing that the package with a new set was hermetically sealed. If the air got inside, it can begin corrosion and oxidation of the strings. Although, for strings with a polymeric winding, like Elixir, it is not relevant. The polymer winding will not let the strings oxidize anyway. Open the package and put the strings in order. So it is more convenient to orient yourself and harder to get confused. D’Addario makes weights in different colors to make it easy to distinguish which string you’re putting on at a glance. That’s very handy.
Order of installation. Starting with the sixth string
Starting with the sixth string, install the entire set in the reverse order of the one we took off the old one: 6-1, 5-2, 4-3. After installing the new set, there’s no need to tune the guitar immediately to the desired tuning. Tighten the strings evenly so that they don’t wobble. And then fine-tune the tuning. Don’t turn your picks too sharply. If you don’t calculate the force and tune your guitar to a higher scale, you could accidentally tear the delicate strings. It can take a while for the strings to stretch properly. To help them out, here’s a little trick. Take a set and roughly tuned string in your hand and start gently pulling on it. This tip hack will help you get your guitar to the right tune faster. Bass guitar strings can take longer to stretch because of their thickness.
How to fasten guitar strings without balls
To fasten a string without balls, especially for a classical guitar, you need to master winding a simple knot loop: pass the end of the string in the bridge for 10-12 cm and wrap it around the end that goes to the head of the neck, then make several turns so that a loop is formed (see the picture).
There are other ways to do it, but this is the one that experienced guitarists usually use.
Winding the guitar string on the tuning fork. Number of turns
The optimal number of turns of the strings is considered: 3-5 turns – for the first and second strings; for the remaining strings, 3-4 turns are enough. If you make a smaller number of strings, the strings can come off, in the reverse situation the guitar will be worse in tune. Also, with the help of string turns. The strings make the whole guitar sway: the head of the neck, the fingerboard, and the soundboard itself. Guitar masters say this has a positive effect on the sustain.
If you have stock picks, lock the damper in place after strumming so your guitar won’t get upset.
With vintage tuners, the string hole may not be on the side, but on top of the string head.
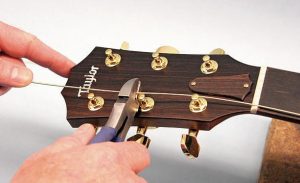
Cut off the excess. Special wire cutters
Once the strings are in place, use wire cutters or a special multi-purpose stringing tool to cut off any excess “whiskers. But don’t cut “to the root” – this is important. If you look around, you can find a tuning fixture with special wire cutters to cut the extra long end of the string at the head of the neck and a cavity for pulling out plugs. A good example is the PLANET WAVES DP-0002.
Tuning the guitar after assembly
When all strings are evenly stretched, tune your guitar to the right tune and give them a good pull. To do this, pull the strings perpendicular to the neck, but don’t overdo them or tear them. Do the same with each string and then tune your guitar again. You might have to repeat this procedure a few times until the strings stretch out. The first time you tune your guitar and form turns, keep the string taut with your hand so it’s easier to wind. The process of stretching the strings to a playable state can take 15-20 minutes. For bass guitars, it may take longer.
The nuances of replacing nylon guitar strings
For classical guitars the question of how to fix the strings at the head of the neck is relevant. We told you above about the bridge. For nylon strings to fix on the head of the neck. Pass its end under the string itself. And only after that start to make the turn of the tuning for the string will be fixed firmly and will not go anywhere.
Installing the strings on the guitar – it’s not difficult. But it’s better to do it once correctly and by the instructions to understand how to do it right and then. Your sound and comfort in playing the instrument depend on this nuance.

Leave a Reply
You must be logged in to post a comment.